A Quick Look at Azure Resource Manager(ARM) Templates
In this post, I’ll quickly take you through the process of deploying an example resource on Azure cloud using Microsoft’s Infrastructure-as-Code(IaC) tool called Azure Resource Manager(ARM). I’ve included instructions for you to follow along but it’s not mandatory. My goal is to give you a rough idea of how IaC can be used to deploy cloud resources via code(JSON in this example) using ARM as an example. I’ll do similar posts for other IaC tools in coming days.
Read my previous post if you want to learn more about IaC and its benefits.
Install Azure CLI
Make sure you have an active Azure cloud account, and then follow the instructions to install Azure CLI for your platform.
On Ubuntu 20.04 for example, you can run the following commands to install Azure CLI.
Note : Don’t use the curl script one-liner listed at Microsoft’s documentation as it will install a very old version that can’t be upgraded via
az upgrade :
If Azure was installed successfully, you should see detailed version information using az –version command.
Authenticate with the Azure cloud service(you’ll be redirected to Azure cloud sign-in page in your default web browser):
- az login
- az account list
az account list command should show you information about your Azure account including your registered email id.
Brief overview of our plan
Your Azure account has one or more subscriptions, each of which can have one or more resource groups, each of which can have one or more resources(like VMs, volumes, load balancers, etc.).
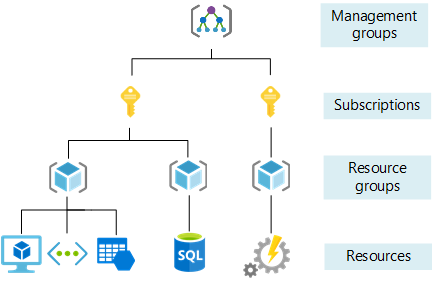
You can ignore Management groups & Subscriptions for the purposes of this post. A subscription should already be selected as default in your Azure account(you can change this from Azure portal if you want). A Resource group is like a project or a namespace to group a bunch of resources.
We’re going to create a new resource group in the currently selected default subscription and then create a storage account resource in it.
Create an ARM template
We first need to use Azure CLI to create an Azure resource group.
Now we can define all the resources that we want to deploy to the above resource group using JSON code in an ARM template file. For example, the following code defines a single resource to create an Azure storage account. Save this code in a file called hello_arm.json. Or download the file
The resource as specified by the type field `Microsoft.Storage/storageAccounts` means it’s going to deploy a Microsoft Storage Account resource.
You can customise the storage account resource in your JSON code using attributes like kind, which can be any one of Storage, StorageV2, BlogStorage, FileStorage, & BlockBlogStorage. Refer to the docs for a full list of customisable attributes supported by the storage account resource.
Deploy the resource
Run the following command to deploy the resource defined in hello_arm.json to helloRG resource group that we created earlier. Make sure you run the following command from the folder where hello_arm.json file is located.
If you get any errors, change the string value of name field in hello_arm.json to something globally unique, like adding your domain name as a prefix. Make sure the length of the name is between 3 & 24 characters.
Don’t use anything other than lower case letters and numbers in the name(no hyphens, no underscores, no spaces, etc.). If you still get errors, retry the command using verbose & debug parameters to try and pinpoint the issue:
You can also get more details by copying the error code(“The tracking id”) and using the following command:
After the resource is deployed successfully, run the following command to see that the resource group helloRG now contains the new storage account:
The output will be in the JSON format. You can also verify the same via the Azure web portal: Go to your Azure account home page, click on
Resource Groups, click on the helloRG, and you should see the storage account listed there.
Run the following commands to delete the storage account we created via ARM template & also the resource group we created via Azure CLI:
Both the list commands should return an empty array. You can also delete these resources from the Azure web portal.
Conclusion
We didn’t deploy anything exciting in this post as my goal was to just get you familiar with the overall method of how ARM templates can be deployed using Azure CLI. All you need to do from here on is to just add more code to the ARM template file to deploy & configure additional resources. I’ll show you how to deploy a group of resources that a web application might typically need in a future post. You can also take a look at the repository of example ARM templates on Github.